• Home
  • About Me
  • Services
  • Blog
  • Store
Max Handyman
619.370.2609

Contractor or Handyman

10/29/2014

5 Comments

 
Picture
I am going to go off on a little rant here. A contractor is not a handyman and a handyman is not a contractor! Fundamentally, a contractor is, in the US, a state licensed provider of construction services, remodeling services or specialty service service providers like electricians, plumbers, concrete, etc. A handyman service is generally a handy person that usually repairs minor damage or handles general maintenance of buildings. For example, if you have a hole in your drywall that needs repair, you don't need a state licensed contractor to make that repair. First of all, it will be too expensive and secondly, the drywall contractor will not even want that small of a job. That's where the handyman comes in. If you have built a addition to your home and need a drywaller, it might be a good move to hire a drywall contractor to hang the drywall. 

Most contractors simply will not take the small jobs simply because they are not cost effective. Service businesses need a minimum amount to charge to make money. a hole in the wall is just a waste of time. Again, this is where a handyman comes in. If you're looking to someone to remodel your kitchen, you might want a contractor to handle that job. A handyman will generally not be licensed to handle that big of a project. Hope this helps...

5 Comments

Installation Of GFCI Outlets

8/9/2014

3 Comments

 
Picture
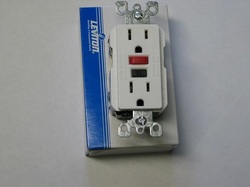
In the US, more than 300 people get electrocuted in their homes every year! This is the reason Ground Force Circuit Interrupt or GFCI outlets are becoming more and more prevalent in today's homes. 

It used to be that municipalities required installation of GFCI outlets in moisture prone areas like kitchens and bathrooms, though now they are being considered as a requirement throughout the home for obvious reasons. 

invented in 1961 by Charles Dalziel, a Professor of Electrical Engineering at UC Berkeley, Its operation is fairly simple. It basically monitors the flow of electricity into and out of a given appliance. If the difference exceeds 5 milliamps, it basically tells itself that a ground fault may be occurring. The GFCI outlets cuts power in as little as .025 seconds. 

We can all see the benefits of the GFCI. It is a little expensive when compared to its more basic brother, but when you weigh in the potential damage it can prevent or even save a loved one's life, it's actually pretty cheap. Primarily preventing shock, fire and damage to appliances.

Installation is the same as the non-GFCI outlets. Remember to turn off power the area you are working on to avoid any problems. Again, if you are not comfortable with electricity, then leave it to the pros. otherwise, if you are handy, it should take too much brain power to install it. 

3 Comments

Ceiling Fan Installation

8/6/2014

5 Comments

 
Picture
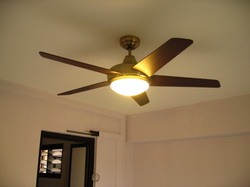
Ceiling fan installation is one of those necessities of summer. Although ceiling fans do not change the temperature in the room, the circulation air gives your body the feeling of the temperature in the room being several degrees cooler. And that is pretty much the whole point. Feeling cooler in the hot weather, right?

If you have basic tools at your disposal you can probably install a ceiling fan yourself. But, Don't blame me if you mess up! If you're willing to do the job, we are assuming you are competent enough to do the job, right? Otherwise take this for educational purposes and get yourself a competent ceiling fan installer. 

First things first. We are assuming there is a powered junction box at the center of the room where the fan will go. We are also assuming the junction box is installed properly and is rated to carry the weight of the ceiling fan. If none of these are in place, STOP! Call a licensed electrician to take a look at your set up. Once proper wiring is complete we can continue.

Assuming everything is properly installed, there will be a light fixture of some kind or even an older ceiling fan. Before you you start, turn the power off to that room by looking in your homes electric panel which will be outside of the house or even inside a closet if you live in a condo apartment. It should be labeled. Otherwise you can shut power off to the whole house.

Start by removing the fixture and and attachments. generally there are 2 screws holding the fixture to the junction box. Disconnect the wiring from the fixture and set aside. Your new ceiling fan will most likely come in a box and will have to be assembled. There will be a bracket that attaches to the junction box by the same two screw or may be provided with your fan. Attach bracket to junction box and run wires through the provided opening. Make sure it's a snug fit but don't over tighten. Every ceiling fan design is different so different steps will be needed with differing designs. For this post we will use a design similar to the picture in this article. Assemble the fan per manufacturers instructions. Take fan body and let it sit in the bracket opening while you wire it. use decorative accessories to hide wiring. Install fan bladed, lights ( if applicable) and you're done. If you followed manufacturers instructions and wired properly it should work now.  Good job!

5 Comments

Mold/Mildew Removal

7/30/2014

1 Comment

 
Picture
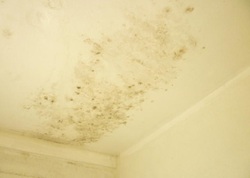
In my experience, mold and mildew stains in bathrooms seem to be caused by two factors. One is the lack of adequate ventilation which causes moisture to build up which then condensates and creates an environment for mold and mildew to propagate. Having adequate ventilation allows moisture to be expelled and diminishes the opportunity for mold or mildew to grow.

The other factor is the paint. A lot of people don't pay attention to the paint that they are using, I mean, paint is paint, right? Well, not exactly. Semi-gloss and high gloss paints have anti mold/mildew properties. That glossy sheen creates a barrier that inhibits mold growth and thus this type of paint should always be used in moisture rich places like bathrooms and kitchens and maybe even laundry rooms.

Removal is fairly easy. You will need to roll up your sleeves, put on a pair of rubber gloves and get to it. With a mixture of bleach and water or better yet, a good stain remover from your local hardware store, you apply the affected areas and let it do its magic. After several minutes grab your brush and start brushing. Once the mold/mildew is removed to your satisfaction dry any excess moisture and let dry. Use a portable fan if possible to speed up the process.

Once the walls are dry, apply a couple of coats of stain blocking primer. Make sure you tape up any trim or fixture you don't want painted with masking tape. Once the primer has dried, you can proceed to applying two coats of semigloss in your desired color. Make sure you follow the paint manufacturers directions to insure a long mold free bathroom experience.

1 Comment

Cracked Or Broken Tile Repair.

7/28/2014

3 Comments

 
Picture
As I am installing a garbage disposer for a customer, she mentions that she will move some items from the kitchen counter top so I have more room to work. I say thank you. Two seconds later BAM! No, it's not Emeril Lagasse spicing it up a bit in the background on TV, it's my hammer. 

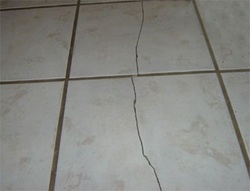
As my customer moves thing away for me to work, she inadvertently drops my hammer onto her tiled kitchen floor and hence adding a crack to one of her floor tiles. The damage was done.

Luckily, I knew what to do. The first thing I did, and you can too if you have the tools, was to chisel out the grout around the damaged tile. Do this carefully as you don't want to damage adjacent good tile. This is done so that when you go chisel out the broken tile you don't pull up non damaged tiles. This is the same concept you see in concrete sidewalks. Have you ever noticed the lines or grooves cut into the concrete creating a series of squares or rectangles as you walk? What this does is basically stops cracks from moving beyond those points and confining the damage to a relatively small area that can be later repaired.

Anyway, after you remove the grout around the damaged tile you can begin the process of chiseling out the affected tile. Remember to remove as much of the mortar under the tile as possible. Once the mortar is removed you will need to vacuum a lot of dust and debris left over from the demolition. Home Depot, Lowes or your local home center should have replacement tile if yours aren't from the 1970's. Otherwise you may have to use a similar design or find tile from a online supplier. You can also find ready made mortar and grout mix to use to set the tile and use the same mix to grout. Several color options are available. Use a grooved spatula to spread mortar mix onto the tile. Set the tile and use a level to make sure it's level all around. After grouting, use a specialty sponge, also found at your home center to clean up excess grout. Use a diagonal stroke as opposed to wiping along the grout lines as this may cause more grout removal than needs be. And there you have it...

3 Comments

Ceiling Fans Basics

7/25/2013

3 Comments

 
Picture
Ceiling fans are definitely a necessity these days and although they can't change the ambient temperature, the flowing air can have a cooling effect by speeding up the rate by which your perspiration evaporates from your skin, hence the cooling feeling when your directly in the path of the fan. 

Depending on the size of your ceiling fan, energy consumption can be between 15 to 30 watts on low speed, 30 to 50 on medium and 50 to 100 watts on high. A typical Florida home has 4.3 ceiling fans and consumes about 800 kwh per year to power these puppies. A central AC uses 2000 to 5000 watts for the same size home.


Choosing the right ceiling fan depend on the size of the room. Blade spans vary from 24" to 80". For room under 75 sq.ft. you want a ceiling fan that's 36 inches or smaller. 75 sq.ft. to 144 sq.ft. consider fans 36" to 42". 144 sq.ft to 225 sq.ft you might look into fans spanning 44" to 50". 225 sq.ft to 400 sq.ft you're looking at a ceiling fan 50" to 54". Large rooms with high ceilings there are lengths from 60" to 80". Large fans are as much about size and function in meeting the requirements of a large area. Since ceiling fans don't actually decrease room temperature, as stated earlier, install them where you spend the most time. Good spots are in a family room, bedroom or kitchen dining area.

Control options vary as well. You can go old school by using the ominous pull chains as most of us remember. Wall switches that control lighting and fan separately (make sure your wiring allows this). Newer versions of ceiling fans come with wireless remote controls. FYI, there are retro fitted remote controls you can add to older ceiling fans. Space considerations have to be accounted for since the control unit has to be placed inside the fan housing. All in all ceiling fans can make summer bearable when you don't have central AC. And that's OK with me since southern California heat is not that bad to begin with.

3 Comments

Garbage Disposer Repair & Installation

7/16/2013

2 Comments

 
Picture
What's going on under the sink? Several problems can come from garbage disposals. To begin with, there is a lot of water going through this machine and no matter how well you take care of it, it won't last forever. Metal pieces will eventually rust. Seals will eventually break. 

But here are a few tips to understand this workhorse. Leaks coming from the garbage disposal can due to several possibilities but for the most part it's the seal that separates the main drive from the blades. While the seals can be replaced, it is usually cheaper to replace the unit when considering part costs and labor costs.

As I mentioned before, there is a lot of water going through the unit. Prolonged use will begin to rust the metal pieces in the garbage disposal. The flange that attaches the disposal to the sink itself may have come loose through years of use and vibration. 

I have found everything from egg shells to dinnerware to bottle caps to glass and everything in between inside the blade area. When a piece of foreign objects get stuck between the blade disc and the wall of the garbage disposal, the motor will seize causing it to hum and trigger the on-board circuit breaker and stops power for reaching the motor. If this happens to you, unplug your disposal, clear out any debris in the unit. Using a hex tool provided with the garbage disposal, you insert the tool at the bottom of the unit and turn until the disposal motor moves freely. There is also a reset button under the disposal to restart the unit. If repairing or replacing a garbage disposal is out of your comfort zone, Max Handyman can help.

2 Comments

How Much Should I Pay For A Handyman?

5/7/2011

3 Comments

 
Picture
This is a difficult question to answer since there are too many factors that contribute to a handyman's rate. I have seen average rates as low as $15 an hour to $120 an hour, depending on what part of the country you live in.  A professional handyman is more than likely running a small business and like any business, there are costs related to running a business. A handy guy with tools doing side jobs will have less overhead and thus  a lower rate. Generally speaking your looking to pay anywhere from $60 to $100 an hour.

A professional handyman will generally take more pride in his work and as a small business owner should understand basic business facts: good work equals more work, bad work equal unemployment. You will generally have a better result from an experience handyman. That's not to say you can't find a good part timer out there but they are very elusive. In general, professional handymen understand that quality is key to longevity.

How much should you pay for a handyman? That depends on how much you are willing to pay for good service. How much is it worth to you? Some handymen bid the project rather than offer an hourly rate. If you want a handyman to come out, bring his tools, provide good service for minimum wage, you are setting yourself up for a bad thing. Look for a guy that's been around for a while, is professional, guarantees his work and, more often than not, it will be a good experience. Be wary of those who promise top quality work for rock bottom rates. I have seen many handymen use that catch phrase to get work but it is impossible to provide. Top quality translates to more time on the job and that translates to more man hours. If you're willing to pay for it, great.

3 Comments

5 Inexpensive Ways To Improve Your Homes Value...

3/30/2011

3 Comments

 
Picture
Unless you are a skilled handyman or contractor, the last thing you want to deal with when searching for a home is repairs. And as soon as someone tries to value your home, every major and minor detail will reduce the value of any property. But there are a few inexpensive things that you can do to raise your homes value quite a bit.

1. Cleanliness is King. A clean home is a healthy home, and the only investment is elbow grease. A dirty home is a real turn off simply in health terms. You can only imagine the bacteria and germs that may be lurking about if you don't clean on a regular basis. Potential home buyers will cringe and begin to exaggerate the situation and will want a discount or at the very least be turned off to the home and leave. A clean looking and smelling home is priceless!

2. Cut & Trim. Overgrowth in the yard is another turn off. Most people do not like working in the yard and will fight you tooth and nail for you to clean the yard or pay for someone to do it. A couple of hours of elbow grease again can yield thousands in turn.

3. Fresh Coat. A fresh coat of paint in both the exterior and interior can double and even triple, if you do it yourself, your painting investment. Old, faded and chipping paint only means that somebody will need to do it before or after the sale, and the buyer will refuse to pay for it.

4. Flooring. Nothing looks worse than a hole in the floor or tiles that pop up or even a wood floor that squeaks so bad you think someone is wearing two live racoons on their feet. The flooring is basically the foundation of the home it needs to be strong.

5. Modern Appliance. By simply adding a new set of appliances will bring that old kitchen into the 21st century. Remember that the majority of home buyers will make their decision based on the efficacy of the kitchen so make it shine.
Hope these tips help your home gain a little value.

3 Comments

    Author

    After a few years as a union carpenter I decided to break out on my own. it's been a great ride.

    Archives

    October 2014
    August 2014
    July 2014
    July 2013
    May 2011
    March 2011

    Categories

    All
    Handyman
    Home Improvement

    RSS Feed

2011 COPYRIGHT BY MAX HANDYMAN. Website by Hector Rodriguez